 PhotoTune
 Home / Brighten photo
Brighten a dark photo on iPhone
Brighten a dark photo on iPhone with PhotoTune’s Lighting tool: raise Exposure, add Contrast, then correct yellow or grey light with Warmth and Vibrance. It works on any photo, and it runs on your phone with no connection.
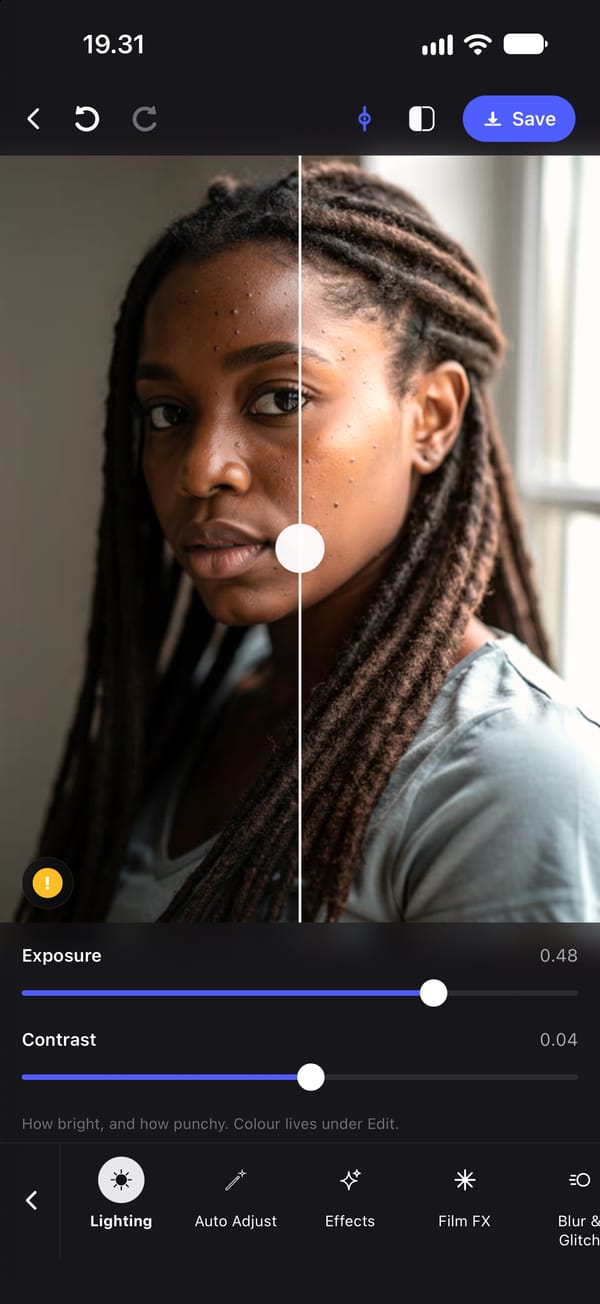
How to brighten a dark photo
Open Lighting and raise Exposure. That lifts the whole photo and fixes most portraits taken indoors, in shade or against a bright window. Then add a little Contrast back, because a brightened photo tends to look flat and grey.
Both sliders run in both directions, so the same tool darkens an overexposed photo and softens one with harsh contrast.
Fix a dull or yellow photo with colour
Brightness is often only half the problem. Warm indoor bulbs turn skin yellow and overcast light turns it grey. The Edit tool has Warmth to cool down or warm up the photo and Vibrance to bring colour back without oversaturating skin.
Cool Down is a shortcut to the same Warmth setting pushed cooler, for a photo that came out too warm.
Colour grades for a consistent look
Filters has nineteen colour grades, from light portrait tints like Soft Warm, Clean and Portrait to film looks like Chrome, Tungsten and Instant, and two black and whites. Each has an Intensity slider, so a grade can be a light tint rather than a filter look.
Apply the grade after fixing exposure. A grade on a dark photo stays a dark photo.
Brighten a face without washing it out
Pushing exposure until the face looks bright can blow out the forehead and cheeks. Brighten until the eyes read clearly, add Contrast to recover shape, and compare with the original by holding the photo.
If small blotches show more once the photo is brighter, a light pass with Skin softens them while keeping texture.
Save the lighting for the next photo
Lighting, colour and grade settings are saved in a Preset. Photos from the same room or the same day usually need the same fix, so apply the Preset and adjust from there. Everything on this page runs on the iPhone with no connection.
How to brighten a photo on iPhone
- 01
Open the photo and choose Lighting
Lighting works on any photo, with or without a face.
- 02
Raise Exposure
Lift it until the subject reads clearly without the brightest areas turning white.
- 03
Add Contrast
A little contrast brings back depth that brightening flattens.
- 04
Correct the colour
Use Warmth in Edit to fix yellow or grey light, and Vibrance to restore colour.
- 05
Export or save as a Preset
Save to your camera roll, or keep the settings for similar photos.
FAQ
Brighten photo: common questions
Still have a question?
Anything not answered here — a device, a photo it struggled with, or how the trial works — reaches a person at this address.
Ask a questionHow do I brighten a dark photo on iPhone?
Raise Exposure in the Lighting tool, then add a little Contrast so the photo does not look flat. Adjust Warmth if the light was yellow or grey.
How do I fix a photo that is too yellow?
Lower Warmth in the Edit tool, or start from Cool Down, then bring back a little Vibrance so skin does not turn grey.
Can I brighten a photo without making it look washed out?
Yes. Brighten less than you think, restore depth with Contrast, and compare against the original as you go.
Does brightening need a face in the photo?
No. Lighting, colour and grades work on any photo.
Does brightening work offline?
Yes. It runs on the phone and needs no connection.
Step-by-step guides
Related tools
- Natural retouch
Natural photo retouch for iPhone
A natural photo retouch app for iPhone. Smooth skin, clear blemishes and fix lighting while pores and skin texture stay. Retouching runs on your phone.
- Reusable edits
Save photo edits and apply them to other photos
Save photo edits as a Preset on iPhone and apply them to other photos in a tap, or to up to 100 at once. Skin, whitening, lighting and colour, reused across faces.
- Headshot editor
Headshot editor for iPhone
Edit a headshot on iPhone for LinkedIn, a team page or a profile photo. Even skin, fix lighting and keep it looking like you, then use the same edit on every headshot.
- Background changer
Change a photo background on iPhone
Change the background of a photo on iPhone to a studio wall, a blurred office, plain white or a warm outdoor scene. The person stays as they are.