 PhotoTune
 Home / Teeth whitening
Whiten teeth in photos on iPhone
Whiten teeth in photos on iPhone with one slider. PhotoTune finds the teeth by detecting the face on your phone, whitens only them, and keeps the result natural. The same tool brightens the whites of the eyes, with a cap that stops them looking painted.
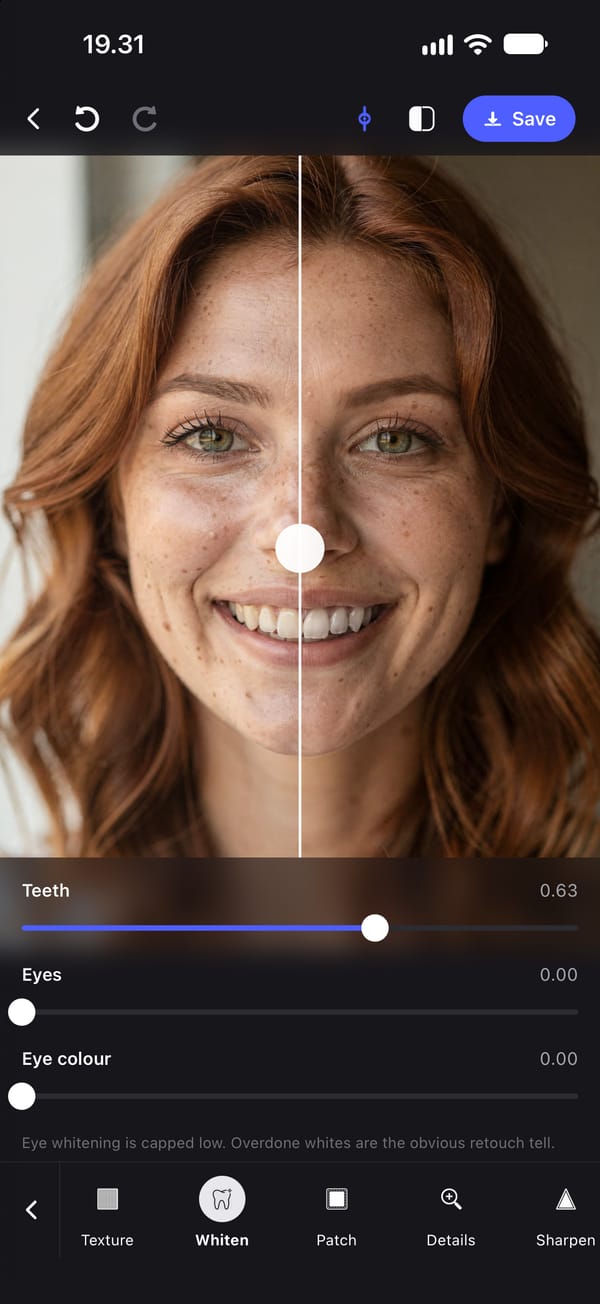
How teeth whitening in a photo works
PhotoTune detects the face on your phone, locates the mouth from the face landmarks, and whitens only the teeth inside it. You set the amount with one slider, and there is no brush to paint with.
The teeth need to be visible. If the smile is closed or the teeth are hidden, the app says so rather than whitening the wrong area, and asks for a more open smile.
Whiten teeth without the too-white look
Teeth whitened to pure white are the fastest way to make a photo look edited. Real teeth are a warm, slightly uneven off-white, and a small lift is usually all a photo needs, especially one taken under warm indoor light that yellows everything.
Move the slider until the teeth look clean, then back it off a little and compare with the original by holding the photo.
Brighten the whites of the eyes
The same tool has an Eyes slider that brightens the whites of the eyes, which helps with tired or red-looking eyes. It is capped at a low maximum on purpose: eye whites pushed past that start to look unnatural.
An Eye colour slider is also there, and it depends on detecting the iris, so it needs a clear, well-lit view of the eyes.
Save it for the next photo
Whitening settings are saved in a Preset along with skin, lighting and colour. Apply the Preset to another photo and the teeth and eyes in that photo are found and treated the same way.
Whitening runs on your phone
Face detection and whitening both run on the iPhone, with no connection, and the photo is not sent anywhere. Exports have no watermark.
How to whiten teeth in a photo on iPhone
- 01
Open a photo with a visible smile
The teeth need to be showing for the tool to find them.
- 02
Open Whiten
The face is detected on the phone and the teeth and eyes are located.
- 03
Raise the Teeth slider
Stop when the teeth look clean rather than white, then compare with the original.
- 04
Lift the eye whites if needed
Add a little Eyes for tired or red eyes. It cannot go past a natural maximum.
- 05
Export or save as a Preset
Save to your camera roll, or keep the settings as a Preset for the next photo.
FAQ
Teeth whitening: common questions
Still have a question?
Anything not answered here — a device, a photo it struggled with, or how the trial works — reaches a person at this address.
Ask a questionHow do I whiten my teeth in a photo on iPhone?
Open the photo in PhotoTune, choose Whiten and raise the Teeth slider. The teeth are found by face detection, so there is nothing to paint.
Why does the app say it cannot find teeth?
The teeth need to be visible. A closed smile, a strong side angle or heavy shadow over the mouth can hide them. Try a photo with a more open smile.
How do I make teeth whitening look natural?
Use a small amount. Aim for clean off-white rather than pure white, and compare against the original photo.
Can I whiten the whites of my eyes too?
Yes, with the Eyes slider in the same tool. It is capped so eyes cannot be made unnaturally white.
Does teeth whitening work offline?
Yes. It runs entirely on the phone and needs no connection.
Step-by-step guides
Related tools
- Natural retouch
Natural photo retouch for iPhone
A natural photo retouch app for iPhone. Smooth skin, clear blemishes and fix lighting while pores and skin texture stay. Retouching runs on your phone.
- Blemish remover
Remove blemishes from photos on iPhone
Get rid of blemishes on photos with a tap. A photo blemish remover for iPhone: Heal copies clean skin from beside each spot, so texture stays. Runs on your phone.
- Reusable edits
Save photo edits and apply them to other photos
Save photo edits as a Preset on iPhone and apply them to other photos in a tap, or to up to 100 at once. Skin, whitening, lighting and colour, reused across faces.
- Makeup editor
Add makeup to a photo on iPhone
Add makeup to a photo on iPhone in four looks: Everyday, Soft, Evening or Bold. Subtle, natural results that keep your skin texture and face shape.