 PhotoTune
 Home / Guides / Remove dark spots from photos
How to remove dark spots and acne marks from a photo
Short answer
A dark spot or an acne mark is a patch of colour, so it is removed by covering that patch, not by blurring the face. On iPhones with Apple Intelligence (Apple lists iPhone 15 Pro, iPhone 15 Pro Max and iPhone 16 models or later), Clean Up in Photos can do it: open the photo, tap Edit, then Tools and Clean Up, and tap the mark. Other iPhones have no such tool in Photos. PhotoTune's Heal removes one mark per tap, on any photo.
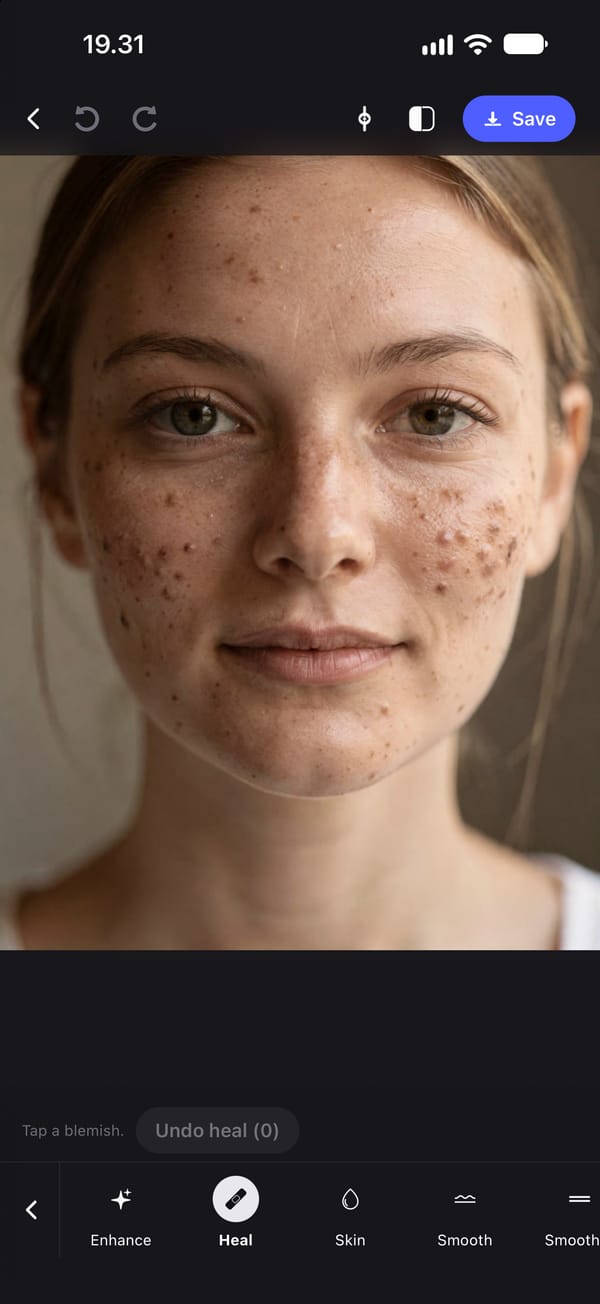
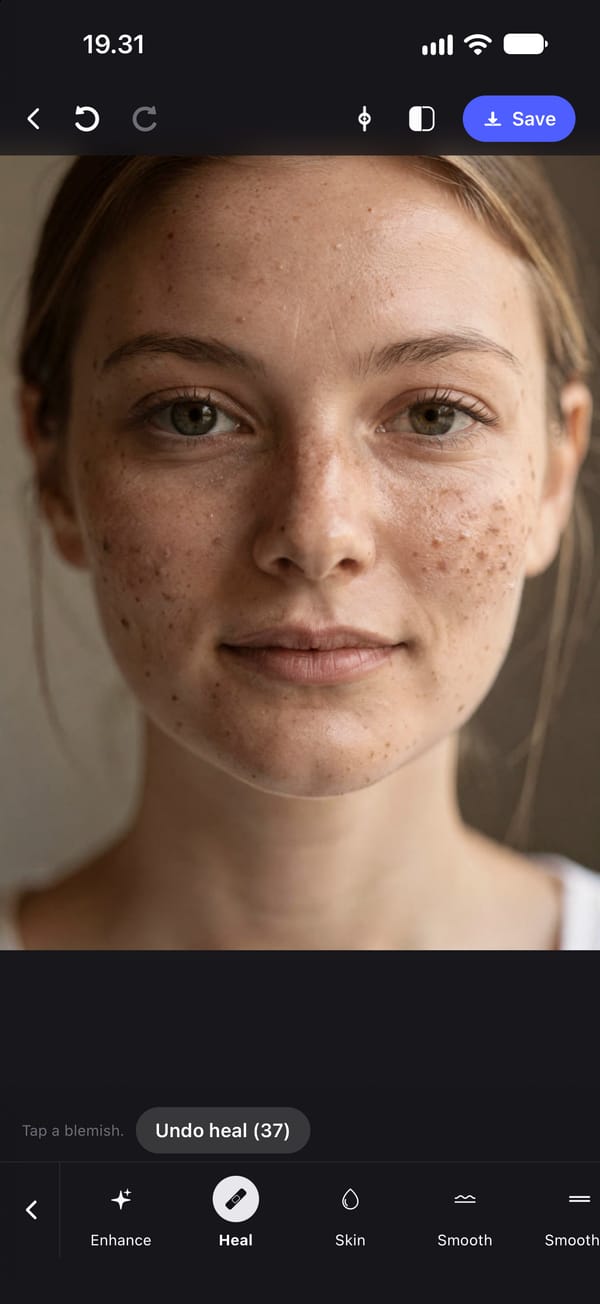
Two ways to remove dark spots and acne marks from a photo, compared
| Photos Clean Up | PhotoTune Heal and Skin | |
|---|---|---|
| Works on | iPhone 15 Pro, iPhone 15 Pro Max, and iPhone 16 models or later, with Apple Intelligence | Does not need Apple Intelligence |
| How you choose a mark | Tap, brush or circle it | Tap it. One tap is one heal |
| Redness across an area | Apple does not describe it as a tone tool | Skin softens blotches. No tool recolours one area |
| Marks off the face | Anything in the photo can be marked | Heal works anywhere. Skin needs a face |
| Undo | Restore while editing, Reset after saving | Undo heal takes back the latest tap |
| Works without a connection | Not stated by Apple. Usage limits may apply | Yes |
| Cost | Included in Photos | A subscription to save the photo |
Remove a dark spot in the Photos app, with Clean Up
Clean Up is the one removal tool built into Photos. Apple's guide presents it as the tool for distracting objects, and a single dark mark on a cheek is small and distinct enough to be marked like one. For one or two marks, on a phone that has it, nothing else is needed.
None of these steps were tried for this guide: Clean Up needs Apple Intelligence, and the iOS 27 simulator our screenshots come from has none. The steps are Apple's; the advice on which marks to choose is ours.
What you need: An iPhone with Apple Intelligence. On iOS 27, Apple lists iPhone 15 Pro, iPhone 15 Pro Max, and iPhone 16 models or later. Clean Up is not available in all languages or regions, and Apple's requirements page says it does not currently work on devices bought in mainland China.
-
Open the photo and start editing
In Photos, tap the edit button on the open photo, then Tools. If the editor shows only Adjust, Filters and Crop, as in the screenshot below, this iPhone does not have Clean Up.
-
Tap Clean Up and pinch in on the mark
Apple's guide says two fingers pinch, zoom or pan the image. Getting close keeps what you mark to the dark spot itself rather than the skin around it.
-
Mark one spot, or one small group
Tap it, brush over it or circle it. Photos may also highlight items on its own so that one tap removes them; on a face, check what a highlight covers first, so a mole or a freckle you meant to keep stays.
-
Restore, save, and Reset later if needed
The restore button brings back something removed by mistake. Confirm the edit, then tap Done to close the photo. To take it back after saving, open Clean Up on the same photo and tap Reset.
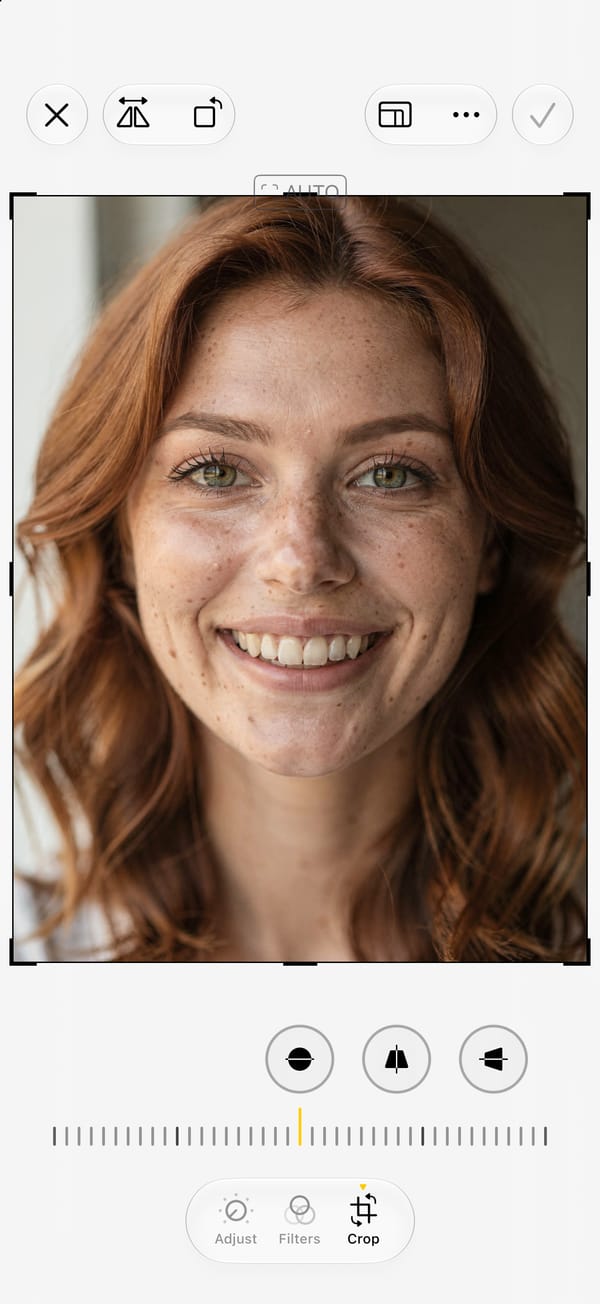
Where it falls short
Clean Up exists only on iPhones with Apple Intelligence, and not in every language or region. Apple presents it as an object remover, not a skin tool, and we could not test how it treats the skin around a mark, so check the result at full size. Apple's iOS 27 guide also says that certain features relying on server-side models, including what it calls Intelligent Photo Editing Tools, have daily usage limits, without saying which Photos tools those are.
Heal each mark with PhotoTune, then soften what is left
Heal deals with one mark per tap. It covers the mark with skin copied from close by, and gives the patch the colour and shading of the skin in a narrow ring just around the tap. A dark spot ends up the colour of the cheek beside it, with real pores over it, and nothing outside the tap changes.
Skin is the second step, for the blotchy colour often left between marks. It smooths the skin of the face and then puts part of the fine detail back, never less than 35%. Both run on the iPhone, and the photo is not sent anywhere.
What you need: An iPhone and the app. Heal works on any photo, with or without a face, and needs no connection. Skin needs a face the app has found.
-
Open the photo, then Retouch, then Heal
Heal is second in the Retouch row, after Enhance, and the panel reads Tap a blemish. It is ready as soon as it opens, so the first tap already heals.
-
Zoom with two fingers
Pinch to zoom and move around with two fingers. In Heal a double tap does not zoom, because every tap is a heal.
-
Start with the darkest marks
Tap the marks you can see at normal size first. Each heal is sized to the face in the photo, so a wider mark takes two or three overlapping taps, each matched to the skin as the tap before it left it.
-
Take back a tap that went wrong
Undo heal removes the most recent tap, and its counter shows how many heals the photo has. If a patch looks wrong, undo it and tap again slightly further into the mark.
-
Soften blotchy colour with Skin, lightly
Skin sits next to Heal. Raise Smoothing a little and keep Texture retention near the top of its range, 0.60. Heals are drawn before Skin whichever order you use them in, so the healed patches are smoothed along with the skin around them.
-
Compare, then save
The split button at the top draws a divider you can drag, with the original to its left, and the button beside it shows the original while you hold it. Save adds the edited photo to your camera roll as a new photo, with no watermark.
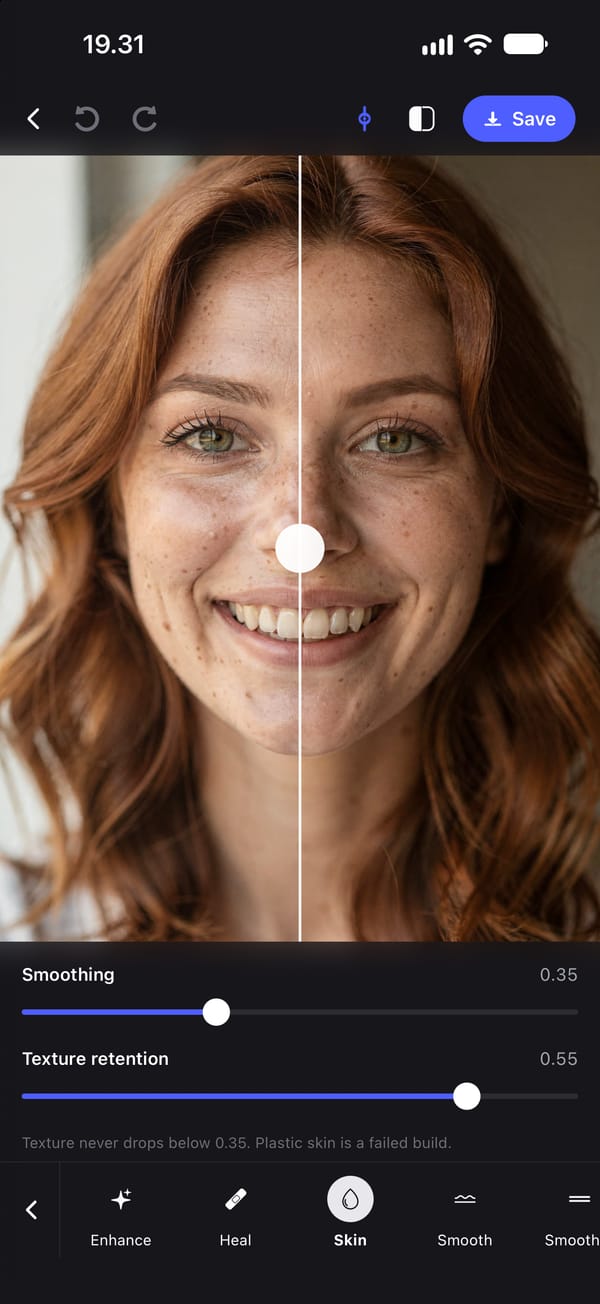
Where it falls short
Heal takes one tap per mark, so a breakout's worth of small marks is slow, and there is no larger brush for a big patch. Because each patch takes its colour from the skin just around it, Heal cannot clear redness or darker skin that spreads wider than the mark. Skin only works on the skin of a face the app has found, softens marks rather than removing them, and PhotoTune has no tool for changing the colour of one area of skin.
Why blurring the face is the wrong fix for dark spots
A dark spot is a difference in colour, not in texture. The skin over a flat mark has the same pores and fine lines as the skin around it; only its colour has changed. Covering the mark with nearby skin corrects the colour and keeps a real surface.
Blurring does the reverse. It takes the texture away and keeps the colour, spread out, so a dark spot turns into a larger, paler smudge while the pores around it go soft. Blur a mark until it is gone and everything near it is blurred just as hard.
PhotoTune's Skin tool cannot go that far. It never returns less than 35% of the fine detail it smooths, which keeps pores, and also means it can soften a mark but never remove it: to Skin, a small mark is fine detail just as a pore is. Distinct marks are a job for Heal.
One mark, a cluster, or uneven tone across an area
One distinct mark, such as a single dark spot on the chin or the mark one pimple left, is the easy case: one tap in Heal, or one tap or circle in Clean Up.
A cluster of small marks after a breakout is where it pays to choose. Tap the darkest and largest, then look at the photo at normal size. The example at the top of this page took 37 taps and left a group of small marks on one cheek, and it still reads as the same face rather than as an edit. Chasing every last mark takes far longer, and the more patches of copied skin there are, the likelier they are to show.
Uneven tone across an area, such as redness left after a breakout or one cheek darker than the other, is not a heal job. Heal matches each patch to the colour around the tap, so inside a red patch the healed skin comes out red too. Skin softens blotchy colour, but it does not recolour an area: a cheek that is evenly pink stays pink.
Which marks to remove from a photo, and which to keep
Freckles, moles and birthmarks are part of what a face looks like from one year to the next, and people who know you would notice one missing. Acne marks and redness after a breakout usually look different a month later. One question sorts most of them: would this mark be in a photo taken next month?
Sun spots and freckles can look alike. A darker spot that sits among freckles and matches them is part of the pattern, and removing it leaves a gap. One that is clearly darker or larger than the rest stands out the way an acne mark does.
None of this is a rule. Heal removes a mole as readily as an acne mark if you tap it, so the choice is yours.
Dark spot removers in other photo editors
Google's Snapseed is free on the App Store, and its listing says it has no subscriptions, purchases, ads or watermarks. Its help page sums up its Healing tool in one line: brush or tap unwanted spots. The listing also names Selective, which adjusts brightness, contrast or saturation in specific areas, the kind of local control that can tone down one patch of redness and that PhotoTune does not have. We have not tested either on skin.
Getting PhotoTune
PhotoTune is an iPhone app; there is no Android or web version. Saving an edited photo needs a subscription, and the annual plan starts with 3 days free. The pricing page has every plan and what the trial turns into.
Sources
What this guide says about software other than PhotoTune comes from the pages below, read on the dates shown. The PhotoTune screenshots are captures of the app.
FAQ
Remove dark spots from photos: common questions
Still have a question?
Anything not answered here — a device, a photo it struggled with, or how the trial works — reaches a person at this address.
Ask a questionHow do I remove acne marks from a photo but keep my freckles?
Use a tool that changes only what you tap. PhotoTune's Heal changes only the small area under each tap, so freckles you do not tap stay as they were. In Clean Up, check anything Photos highlights before accepting it, and use the restore button if a freckle goes.
Why does a healed spot still look red or dark?
PhotoTune's Heal gives each patch the colour of the skin in a narrow ring around the tap. If redness or darker skin spreads wider than the mark, that ring is red or dark too, and so is the patch. Blotchy colour softens with Skin; an evenly coloured area is beyond both tools.
Can I remove the same dark spots from several photos at once?
No. In PhotoTune, heals belong to the photo they were made on, because a mark sits in a different place in every photo, so they never go into a Preset or a batch. Skin settings can be saved in a Preset and used on the next photo.
Will the iPhone's Soft Skin style hide dark spots?
Apple does not say it does. Its iOS 27 guide lists Soft Skin as a texture for a photo's Photographic Style, beside Glow and Film, for photos captured on iPhone 18 Pro or iPhone 18 Pro Max. There is no step for choosing an area, so it cannot be aimed at one mark. We have not tested it.
Should I remove moles and birthmarks from photos?
That is your decision, and the tools will not make it for you: Heal treats a mole like any other mark, and Clean Up removes whatever you tap, brush or circle. A useful test is whether the mark will still be there next month. If it will, it is part of how you look.
The tools in this guide
- Blemish remover
Remove blemishes from photos on iPhone
Get rid of blemishes on photos with a tap. A photo blemish remover for iPhone: Heal copies clean skin from beside each spot, so texture stays. Runs on your phone.
- Pimple remover
Pimple remover for iPhone photos
A pimple remover for iPhone photos. Tap a pimple and Heal covers it with clean skin from right beside it, so the skin keeps its texture. Runs on your phone.
- Natural retouch
Natural photo retouch for iPhone
A natural photo retouch app for iPhone. Smooth skin, clear blemishes and fix lighting while pores and skin texture stay. Retouching runs on your phone.