 PhotoTune
 Home / Guides / Smooth skin in iPhone photos
How to smooth skin in a photo on iPhone
Short answer
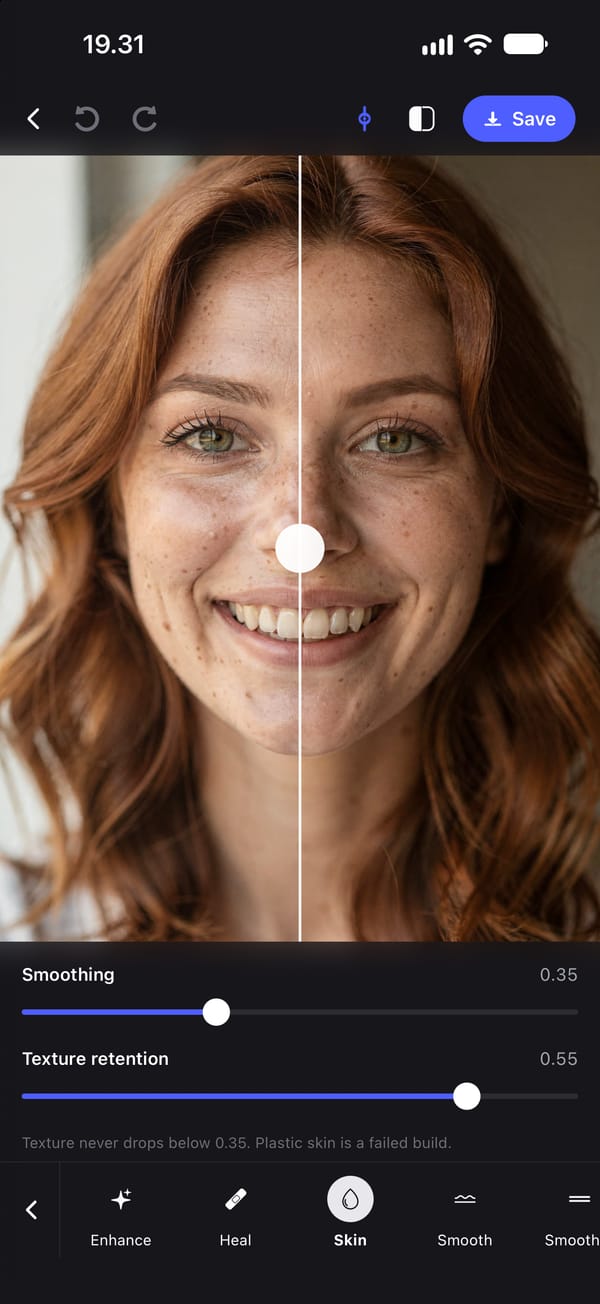
The iPhone's Photos app has no skin smoothing tool for most photos. Apple's iOS 27 guide names one exception: a photo taken on an iPhone 18 Pro or iPhone 18 Pro Max can be given the Soft Skin texture under Styles. For any other photo you need an editor. In PhotoTune, open the photo, tap Retouch, then Skin, and raise Smoothing. It always keeps at least 35% of the fine skin detail, so pores and freckles stay.
Two ways to smooth skin in a photo on iPhone, compared
| Photos Soft Skin | PhotoTune Skin | |
|---|---|---|
| Works on | Photos taken on an iPhone 18 Pro or iPhone 18 Pro Max with a Photographic Style | Any photo with a face the app can find |
| What it changes | Skin details, in Apple's words. Apple does not say what else | The skin of one face. Eyes, brows, lips and nostrils are left out |
| Fine detail kept | Apple does not say | At least 35%, at any setting |
| Controls | A choice of texture, and an intensity slider | Smoothing, and Texture retention from 0.35 to 0.60 |
| Taking it back | Choose Standard for no texture. Apple says effects can be reversed at any time | Undo while you edit. Saving writes a new photo |
| Cost | Free, part of the iPhone | A subscription to save the photo |
Soften skin with Soft Skin in the Photos app, on an iPhone 18 Pro photo
There is no skin smoothing tool in the Photos app's Adjust settings. Apple's guide to editing photos on iOS 27 describes them as light and colour settings, naming Exposure, Brilliance and Highlights among them, and it describes no way to limit any of them to skin.
The one skin option in Apple's guide is in Photographic Styles. On photos captured on an iPhone 18 Pro or iPhone 18 Pro Max, Apple's guide lists a Texture choice under Styles, with Soft Skin, Glow and Film among the textures. Apple's iPhone 18 Pro page says the texture controls are there to soften skin details or give a film look.
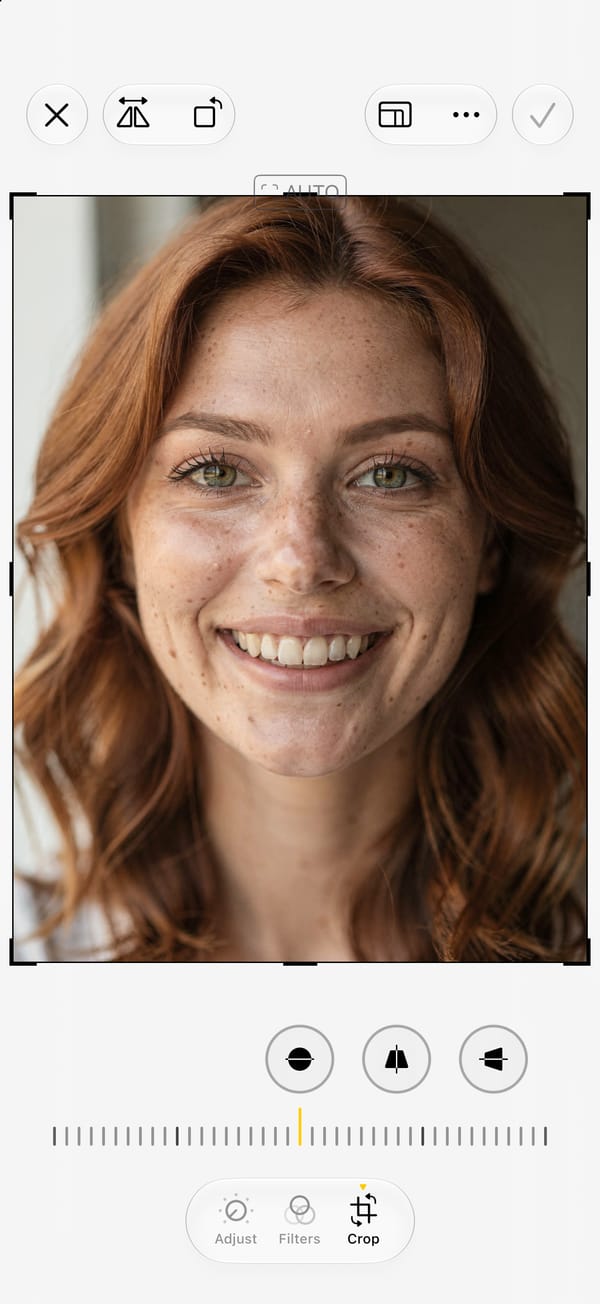
We could not test Soft Skin for this guide. The iPhone simulator cannot take a photo on an iPhone 18 Pro, so the steps below are Apple's, and the screenshot shows what the editor offers on a photo without a Photographic Style.
What you need: A photo taken on an iPhone 18 Pro or iPhone 18 Pro Max with a Photographic Style. Apple says Camera must capture with High Efficiency for the style to be editable later, which is set in Settings, Camera, Formats.
-
Turn on High Efficiency before you take the photo
In Settings, tap Camera, then Formats, then High Efficiency. Apple's guide says the Photos app can only edit a photo's Photographic Style if it was captured this way.
-
Open the photo in Photos and tap Edit
It has to be a photo taken with a Photographic Style on an iPhone 18 Pro or iPhone 18 Pro Max.
-
Tap Styles, then Texture
Styles is where Apple's guide puts a photo's tone, colour and texture. Soft Skin is one of the textures, alongside Glow and Film.
-
Choose Soft Skin and set the slider
Drag the slider to set how strong the texture is. Choosing Standard applies no texture, which takes Soft Skin off again.
-
Tap Done
Done saves the edit to the photo. Apple's iPhone 18 Pro page says these effects can be adjusted or reversed at any time.
Where it falls short
Soft Skin only exists for photos taken on an iPhone 18 Pro or iPhone 18 Pro Max, with a Photographic Style and High Efficiency capture, so it cannot help with an older photo or one taken on another phone. Apple says the texture controls can soften skin details, but not how much of the skin's texture Soft Skin keeps or whether anything other than skin changes, and we have not been able to test it. Look at the result at full size, next to the original, before you keep it.
Smooth skin and keep its texture, with PhotoTune's Skin tool
Skin finds the face on your phone and smooths only the skin inside its outline. The eyes, brows, lips and nostrils are cut out of the smoothing, and its edge fades out softly rather than stopping at a line, so there is no seam at the jaw or the hairline.
It works by splitting the face into two layers: a blurred one that holds colour and shading, and a detail layer that holds everything finer, from pores and freckles to fine lines and small bumps. Smoothing turns the detail layer down. Texture retention decides how much of it comes back, and it cannot be set below 0.35, so at least 35% of the photo's own fine detail is always kept. The blur is sized to the face, so a close-up and a wider shot are smoothed to the same degree.
Smoothing runs on the iPhone, without a connection, and the photo is not sent anywhere.
What you need: An iPhone, the app, and a photo with a clear face in it.
-
Open a photo with a clear face
Tap the photo on Home, or the plus button to pick one. Every photo opens with a light starting edit, the Default Preset, which already sets Smoothing to 0.35 and Texture retention to 0.55. If you have picked a Preset of your own on Home, the photo opens with that instead.
-
Tap Retouch, then Skin
Retouch is the second group along the bottom of the editor. Skin is its third tool, after Enhance and Heal, and it has two sliders.
-
Set Smoothing
It runs from 0.00 to 1.00. Raise it until small blotches and bumps calm down, then stop. Move it in small steps, because the difference builds up faster than it looks.
-
Set Texture retention
It runs from 0.35 to 0.60. Higher keeps more pores, freckles and fine lines. Lower gives a softer finish, and 0.35 is as far as it goes. If the skin starts to look smooth in a way skin is not, raise it before you lower Smoothing.
-
Compare with the original
Tap the split button at the top of the editor to put a divider through the photo, with the original on the left. Drag it across the face, and look at the freckles and the skin beside the nose, where over-smoothing shows first.
-
Or start from Smooth or Smoother
These are the same effect with one slider each. Smooth fixes Texture retention at 0.60, the most detail the app can keep. Smoother fixes it at 0.35, the floor, for a stronger result that still keeps at least 35% of the detail. Texture is the retention slider on its own.
-
Save it as a Preset, to use on other photos
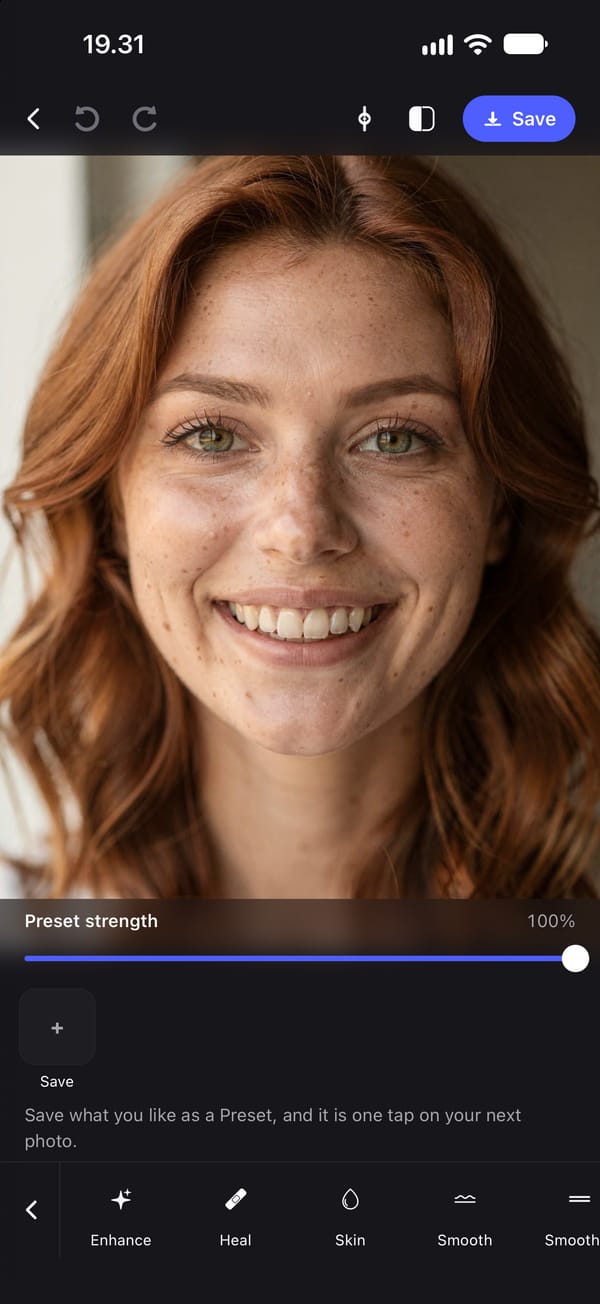
With no tool open, the editor shows Preset strength with a Save tile under it. Tap Save to keep these settings. On Home, pick the Preset and the next photo you open starts with it. Preset strength turns the smoothing down for a photo that needs less, and Texture retention stays where you saved it.
-
Save the photo
Save writes a new JPEG to your camera roll at the photo's own resolution, with no watermark. The photo you opened is not changed.
Where it falls short
Skin needs a face to work on, and it finds one face per photo. In a group photo only one face is smoothed, and on a photo where no face is found the skin tools say so and change nothing. Smoothing does not pick out blemishes: it turns down all fine detail by the same amount, a spot and the pores around it alike, so for a pimple Heal is the right tool. It works on small detail, so it does not change the colour of a wide area such as a flushed cheek. It smooths the face and not the neck or shoulders, so a heavy setting can leave the face smoother than the skin below it.
Why smoothed skin looks plastic
Skin in a photo is two things at once. There is its colour and shading, which change slowly across the face, and there is fine detail, which changes from one point to the next: pores, freckles, fine lines, tiny hairs, small bumps. A blemish is fine detail too.
Most smoothing is a blur, and a blur cannot tell a spot from a pore. It removes them together. Push it far enough and the face keeps its colour but loses its surface, and colour without surface is what people mean when they say a face looks plastic, waxy or airbrushed.
Two other things give it away. One is a hard edge where the smoothing stops, at the jaw or the hairline. The other is smoothing that spills onto the eyes, brows and lips, which should stay sharp. PhotoTune's Skin tool is built around all three: a floor on how much detail it removes, a soft edge, and the eyes, brows, lips and nostrils cut out.
How much smoothing is enough
Less than you think. At the settings in the screenshot above, Smoothing 0.35 and Texture retention 0.55, the middle of the face loses about 16% of its fine detail, and the difference is easy to see side by side and hard to see on its own. Smoother at full strength takes away 65%, which is the most PhotoTune will remove.
A useful test is the freckles. If they are fading, the pores are going with them. Look at the photo at the size people will see it, on a phone screen, and then zoomed in on a cheek. If it only looks right zoomed out, it is too much.
If one pimple is the reason you are smoothing, heal it instead and smooth lightly, or not at all. Smoothing a whole face hard enough to hide one spot is the most common way a retouch ends up looking edited.
Is PhotoTune's skin smoother AI?
Not in the sense most people mean. A face detection model finds the face on the iPhone, and the smoothing itself is a fixed calculation on the photo's own pixels. Nothing is generated, no new skin is drawn, and the photo is not sent anywhere.
PhotoTune does have separate AI tools, such as Vanish, Hairstyles and Backdrop. Those are different: tapping one sends the photo to our editing service. None of them is needed to smooth skin.
Smoothing skin in Facetune and other apps
Many photo editors have a smoothing tool. Facetune's own page lists a Smooth tool, which it describes as giving skin an even look with control over how smooth it goes, and a separate Texture tool that adds fine texture back to skin after smoothing.
PhotoTune works the other way round: it never takes all of the photo's own detail away, so there is nothing to add back. Whichever app you use, the checks above still apply. Compare with the original, deal with spots one at a time, and stop while the freckles are still there.
Getting PhotoTune
PhotoTune is an iPhone app; there is no Android or web version. Saving an edited photo needs a subscription, and the annual plan starts with 3 days free. The pricing page has every plan and what the trial turns into.
Sources
What this guide says about software other than PhotoTune comes from the pages below, read on the dates shown. The PhotoTune screenshots are captures of the app.
FAQ
Smooth skin in iPhone photos: common questions
Still have a question?
Anything not answered here — a device, a photo it struggled with, or how the trial works — reaches a person at this address.
Ask a questionCan you smooth skin in the iPhone Photos app?
Only in photos taken on an iPhone 18 Pro or iPhone 18 Pro Max, where Apple's guide lists a Soft Skin texture under Styles. For any other photo, Photos has no skin tool. Its Adjust settings change the light and colour of the photo, and Apple's guide describes no way to limit them to skin.
Does Clean Up in Photos smooth skin?
Apple describes Clean Up as a tool for removing distracting objects from a photo, on iPhones with Apple Intelligence. It is not described as a way to smooth skin.
How do I smooth skin without it looking fake?
Use an editor that keeps part of the skin's fine detail, smooth less than you think, and compare with the original as you go. Heal individual spots instead of smoothing harder, and stop while freckles and pores are still visible.
Is there a one-tap way to smooth skin in PhotoTune?
Enhance measures the photo and sets Smoothing from how textured the skin is, up to 0.70, so skin that is already clear gets none. It also sets exposure and contrast and whitens the teeth and the whites of the eyes, and Undo takes it back.
Can I smooth skin in a group photo?
PhotoTune finds one face per photo, so in a group photo only one face is smoothed and the others are left as they were.
Does PhotoTune send my photo anywhere to smooth skin?
No. Face detection and smoothing run on the iPhone with no connection, and the photo is not sent to a server.
The tools in this guide
- Natural retouch
Natural photo retouch for iPhone
A natural photo retouch app for iPhone. Smooth skin, clear blemishes and fix lighting while pores and skin texture stay. Retouching runs on your phone.
- Blemish remover
Remove blemishes from photos on iPhone
Get rid of blemishes on photos with a tap. A photo blemish remover for iPhone: Heal copies clean skin from beside each spot, so texture stays. Runs on your phone.
- Reusable edits
Save photo edits and apply them to other photos
Save photo edits as a Preset on iPhone and apply them to other photos in a tap, or to up to 100 at once. Skin, whitening, lighting and colour, reused across faces.